Tuesday, October 25, 2011

Provisions and Painted Shoes

God provides.

I know I talk about this a lot, but it always amazes me how God comes through just in the nick of time.  Granted, sometimes God's timing scares me; I'm a planner.  I want to know what's going to happen, when it's going to happen, how it's going to happen, who it's going to happen with, and I want to know all of this at least a month in advance.  That's my timing; God's timing doesn't usually match up with that, so I get worried until He works things out.  One day I'll learn not to do this.  Until that day, I'm going to keep thanking God for providing just in what I consider the nick of time.

My fiance and I have been stressing about a few wedding things.  I guess he doesn't worry that much; he lets me do all of that! ;)  But I've been worried with good reason.  Just about two weeks ago we went and got our marriage license, which meant we could finally call the courthouse back home and schedule our JoP wedding for next month (side note: it's less than 3 weeks away now!  Where does the time go?!).  So I called and spoke with Eddie the Bailiff, who informed me that due to Veteran's Day all the courthouses in Ohio would be closed on 11/11/11. 

WHAT?!  ::insert Melissa freakout mode here::
So as I'm trying my hardest not to let Eddie the Bailiff know that I'm almost in tears, I thank him and hang up.  Next call?  To Mom, hoping she can fix this.  How?  Not totally sure.  Maybe she has an ordained minister and a beautiful wedding location that are both free and available on 11/11?  Close.  She recommended an elementary schoolmate's ordained father and their beautiful great room for the ceremony.  After a few frantic phone calls to hunt down our (hopefully) minister, as well as a sitting on my friend Krista's floor deciding if getting her ordained online would work, I hear back from Pastor Oglesbee and set up a meeting to talk about it.  Now my nerves are going full-force: what if he won't marry us because it's last minute and we haven't done any premarital counseling with him?

It's funny how God works.  :)
We met with Pastor Oglesbee on Sunday afternoon, and it was perfect.  He's every bit as wonderful as I remember him being when I would go to his house to play with his daughter, and he's more than happy to perform our ceremony!  Best part?  At the courthouse, it would have been a very clinical "ceremony" without any mention of God at all.  Pastor Oglesbee's ceremony, on the other hand, is a traditional Methodist ceremony and puts God right in the middle of it, much like our marriage will be.  It's perfect, and it's amazing how God makes things work.

It was actually a very wedding-filled weekend.  My fiance, Mom, and I checked out a gorgeous, absolutely perfect ceremony/reception venue for the traditional wedding next year, their date of availability is perfect with our plans, and the owner is doing so much to help us work within the means of our budget!  It's truly a blessing to find this place, and hopefully we'll be signing the contract for it very, very soon.  On Sunday Mom and I went to a bridal show.  We may have found the DJ, we got the tux situation settled (yay for deals and me winning a $50 gift certificate!), and we tested roughly 15 kinds of cake.  It was wonderful!  I also got to grab my shoes from home and was able to spend today getting them ready:

The bottoms of my shoes are now my "something blue" and they have the names of my grandmothers on them: Madeline Lucienne and Ruth Marie.  I got this idea from combining a few things from Pinterest.  The blue shoe bottoms totally came from Pinterest, and they aren't that creative on my part.  I've seen different pictures of things on the bottoms of shoes:  I do.  The wedding date.  Your married name.  But since both of my grandmothers were very important in my life, this is my tribute to them since they are both in Heaven watching down on me for my wedding day. <3

Lots of blessings, lots of provisions, and lots of excitement for our wedding!
It's going to be here so soon, and I can't believe how quickly it's coming up.  In 17 days, I will be married to my best friend and starting the next chapter of our lives together (plus having a pretty great little honeymoon, too!)  The next 2 weeks can't go by fast enough!


Photobucket

Monday, October 17, 2011

Tutorial: Glass Bottle Monsters

First off, let me just say how much I'm loving Link Parties!  :)  Seriously, not just to feature my own projects, but to get ideas, recipes, and projects for new things!  Isn't sharing great?

Last week, I linked up my Bread in a Can Tutorial to my newest obsession, Project Queen, (yup, new obsession added to the list over there ---->) and she loved it so much I'm going to be featured on her blog tonight!  Go check it out (yes, I'm pretty excited about it---so once you're done reading this tutorial, go check her page.  For real.)  This is my second project to be featured (remember, my jewelry holder was featured at the Sasse Life) and it's pretty great :) What a fab way to start my week, especially since I'm not feeling so hot today.  I think whatever bug has been going around the preschool kids and teachers has finally hit me.  Boo.


That's not stopping me from uploading my latest project: Glass Bottle Monsters.  I did this last week,  but it was a very busy weekend and this is the first chance I've had to actually sit down and post it.  So here it is!


How stinkin' cute are these guys?! Super easy too.

Get your stuff together first:
Glass bottles (any size and shape will do) that are rinsed out and labels have been removed
White primer spray paint (not pictured)
Light green paint
Dark green paint
Orange paint
Brown paint
White paint
Black paint
Brushes
Burlap
Hot glue gun and glue stick (not pictured)

In the pic, you can see that I've already removed the labels from my bottles and primed them with white primer spray paint.  This will make painting them a hundred times easier, I promise!  

Once the primer has dried, paint them accordingly.  I used 2 different sized olive oil bottles for Frankenstein and the mummy and an old sangria jug for my pumpkin (since it's round, it made sense to use that one for the pumpkin).  I painted the Frankenstein with the brighter of the two greens, and I did pain the main face area of the mummy with a white acrylic paint to make it brighter and make it stand out more.  Because the mummy will be wrapped with burlap, I didn't see any point in painting the whole thing.

Once the acrylic had dried, I painted the eye details on the mummy.  I wanted him to be more of an angry monster, so I gave him angry eyes.  Once they were dry, I used the non-bristle end of my paint brush to put a small white dot on the inner part of each eye.

Once his eyes were dry, I cut 3 strips of burlap to wrap my bottle (1 inch width, 12 inch length on each strip).  I started my strips at the back of the mummy and used a small dot of hot glue to secure the end.  Then I wrapped the mummy, using hot glue sparingly to help keep the strips in place--basically, I only used glue to keep it attached around the curves of the bottle and the ends of the strips.

Next, I moved on to Frankie.  I started out by painting the lid and top part of the bottle black for his hair (sorry the picture is a little dark--we don't have good lighting in the livingroom at night).  I thought Frankie should be a nice monster, hence the cute smile and cartoon eyes; I've always felt Frankenstein was just a little misunderstood and was actually probably a very nice monster! :)  Then I used a thin brush to paint on a few scars and stitches.  Voila!  Frankie is done!

Last, we have Jack O. Lantern.  This can be fun--use black paint and paint on any fun jack o'lantern face you want.  I kept it pretty simple, but you could have a lot of fun with this one.  Get creative!  I painted the lid and top part of the neck brown (the stem) and used the softer, lighter green to paint the jug handle (a leaf) to give it a little more character.

Once all three bottles have dried, I used a matte finishing spray sealant on Frankie and Jack to make sure the paint didn't get scratched off and to finish them up, and lightly sprayed the mummy with the white primer to give his burlap wrap a little bit of color.

Just too cute, and a great upcycle of glass bottles you probably would have just recycled or thrown out anyway.  What a fun decoration!

Here's the wrap-up on cost:
Glass bottles: Free (well, I mean I paid for them at the store but I consider them free since they were trash)
Paint: Already had
Burlap: $1.00 for 1/4 yard at $3.99/yard

Total Cost: $1.00
WOW!!  What a cheap, easy, and fun project!!

You could do this with any Halloween creature, too:  black cat, witch, spider, anything!  Get creative with it, and then let me know how your bottles turned out :)

Pin It


Photobucket

Thursday, October 6, 2011

Tutorial: Bread in a Can

A few weeks ago, while having coffee with my friend from college, Krissy, I told her about how I found this great idea for making bread in a can from this great craft blog.  After going on about how it combined my two loves: baking and crafting, and how much I couldn't wait to try this project for my blog, she asked me if I could wait just a few more weeks to do it, but that if I did wait she would pay me for it.

Um.  Duh.  Of course I will--are you kidding me?  I have a million other craft ideas to create and blog in the mean time!

She's a high school teacher who needed a nice gift for her secret pal at work, and thought that bread in a can would be perfect!  She told me she'd pay me for the materials, plus for my work (I told her none of this was necessary, but she insisted) and that she's need them at the beginning of October.  Perfect!  I can make yummy Fall quick breads in cute cans, and it's a great excuse to go crazy with the decorating--I mean, who wants an undecorated, uncute gift?  No one!  Let the crafting begin!

So this week, I made bread in a can.  Again, I can't take full credit for this--it's something that's been going around the crafting world for a while, and I got my banana bread recipe from Chasing Fireflies.  What I didn't get from her wonderful blog was a recipe for a pumpkin quick bread (which I already had) and the ideas for how I was going to decorate these beautiful cans.


If you want the banana bread recipe, head over to Chasing Fireflies because she has done an amazing job with the recipe and her own design of the cans.

Here's my recipe for pumpkin quick bread.  You can add walnuts to it, but since I didn't know if the receiver of this gift has any allergies, I decided to leave it out this time.  But it's definitely yummy to add a 1/2 cup of walnuts to this before you bake it!

Pumpkin Quick Bread
1 1/2 c flour
1/2 tsp salt
1 c sugar
1 tsp baking soda
1 cup pumpkin puree (canned or fresh)
1/2 c veg oil
2 eggs, beaten
1/4 c water
1/2 tsp nutmeg
1/2 tsp allspice
1/2 tsp cinnamon


 First, mix your dry ingredients (including sugar for this recipe) in one bowl and your wet ingredients in another bowl.  Super easy, right?
 Now is the hard part:  mix them together.  Okay, I'm kidding; this is not hard.  In fact, this might be one of the easiest recipes ever.
 Instead of baking them in a loaf pan or muffin pan, I'm baking them in washed out veggie cans!  One can for pumpkin, one can for Chasing Fireflie's banana bread, and a third can (not pictured) for the leftovers so that I can munch on them...hehehe...
 All I did was take off the lid (make sure to use a can opener that doesn't leave a jagged or sharp edge), take of the labels, and wash them out very well.

Before you pour your bread into the cans, though, you need to make the new pretty labels.  Trust me, this is way easier before you bake them than after!  I just chose 2 different scrapbook papers that have complementary colors, plus 2 small tags.

 Take the paper and wrap it around the can with the pretty side facing in.  This way, you can draw on the paper without worrying that the receiver will see it.
 Draw around the edge of the bottom of the can so you know where to cut.  I used the inside part of the bottom lip so that I'll have a silver can border around the edge of each paper.  You can kind of feel where it indents, and then I just used a pencil to mark it.
 Cut your paper on the pencil line, and voila!  You have a new, much prettier label for your bread cans.  You don't want to bake the labels, though, so don't attach them yet.
 Next, I traced the tag onto the scraps of paper left over, cut it out, and glued them on so I had matching tags for each can.
 You can see here are my 2 labels and 2 tags.  Since they are complimentary colors, you can mix and match the tags and labels if you want.
 Now, fill your unlabeled cans.  I filled each of them 3/4 of the way full.  Be careful!!  If you fill them too full, they will bake over the top and that won't be a very pretty display--it can also fall off into your oven and make that awful burning smell....not that I know from experience or anything...
 Once they come out of the oven, let them cool completely before you try to put the labels on.  I put them in the fridge overnight to ensure that they were cool enough.  I also then let them warm up to room temp before I tried to put the labels on, so the cold can didn't cool the hot glue too fast for me to put the labels on.

I used hot glue to attach the labels to each can.  Go slow, only gluing a small portion at a time, and make sure you line up your label before you glue or your label might be warped when you're finished.  I didn't take pics of this because it's hard to hold a camera, a can, and a glue gun all at the same time.  But here are the cans after they were labeled:

 Next, I cut plastic wrap just big enough to cover the tops of each can with just a little hanging over the edge.  This will keep them fresh before you give them away.  I used 2 layers of plastic wrap, just to make sure.
 I used 2 squares of matching fabric on each can, just laying them on top with alternating points, and then folded the edges over the can lip.  I used twine to secure the plastic wrap and material down (to keep them fresh) and then used twine to tie a pretty bow on top with my labels.

Here they are all finished:

How cute are these to give and get?!  A great gift for a friend, coworker, teacher, new neighbor--anyone would love to get these!!  :)

Totaling up the cost of these is a little harder, because it depends what you have on-stock in your cupboard.  This is definitely a project/gift that you can do for under $10 though!

So go ahead and give it a try--even if you don't give it away, and you just make some bread in a can for yourself to eat on a crisp Fall afternoon!  Bon appetit!


Pin It


Photobucket

Saturday, October 1, 2011

Hello October!

I know I say this all the time, so please forgive the redundancy, but I love Fall!

Today, I decorated the house for Fall...


...and started my morning with a Pumpkin Spice Latte from Sbux!
 

My friend Jessie is having a birthday get-together today with her husband and their families, and since it's Fall I wanted to make something yummy and perfect to take.  I have been craving everything pumpkin lately, and what better to take to a Fall party than pumpkin pie, especially when you're the fourth generation with a pumpkin pie family recipe (thank you Grammy!)?!  But pumpkin pie can be messy to eat, and one pie will only feed about 8 people (6 if you're like my family and want your slices big!) so I decided to make hand-pies.

If you don't know what a hand-pie is, it's a small, hand-held foldover pie that is about 2 or 3 bites big.  Perfect to eat at a party, not messy, and you can make a bunch of them out of one pie recipe.  Oh, and they are pretty dang delicious!


Here's what you need:
(this recipe will make about 40-45 handpies or one regular-sized pie)
1 cup pumpkin (either canned or fresh)
1 cup milk
1 cup sugar
2 eggs
1 tsp flour
1/2 tsp salt
1/4 tsp cinnamon
1/4 tsp nutmeg
1/4 tsp cloves

In my picture, you can see a can of pumpkin and then a cup of fresh pumpkin in the container with the purple lid.  My family has always made it with fresh pumpkin, but canned pumpkin works just as well.  Your choice!

Oh, and PS: I'm using my upcycled cookie sheet to message holder to hold my recipe card.  It's great, hands-free so your recipe card doesn't get all gross, and soooo easy to make!

Okay, so lets make some pies!
 First, mix the pumpkin, sugar, milk, and eggs in a mixing bowl until combined.
 Then add your flour, salt, and spices, and combine again.  If you're using fresh pumpkin, your mixture will be a little lumpy, and no matter what it's going to be soupy and runny--that's a good thing!

If you're making a regular-sized pie, pour it into a 9 inch pie crust.
If you're making mini handpies, pour into a baking dish (mine is 8 inches).

Bake at 350 degrees for 45-60 minutes.  While it's baking, I made my mini handpie crusts.  You have to bake the filling before you put it into the mini handpie crusts because it will be too liquidy if you don't.  That does not make for a very yummy (or clean) handpie.

So now it's crust time!  I used 4 9-inch premade pie crusts, which makes about 40 mini pie crusts, but only if you take the scraps, reroll them out, and continue cutting crusts until the scraps are too small to use.  I rolled out my dough onto a floured countertop and used a standard drinking glass to cut my rounds (a biscuit cutter would work just as well, but I don't have one lol) 
 Here are all my beautiful rounds!
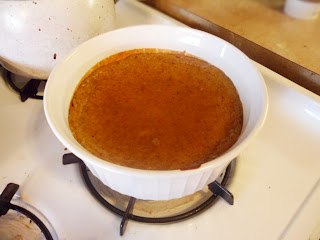
 And here is my very yummy pie filling just out of the oven.  If you take it out and it's still liquidy in the middle, put it back in for about 7 minutes.  It will continue to finish firming up as it stands cooling, but you want it pretty firm when you take it out.  (Please ignore my dirty teapot and stove...)
 I put a little blob of filling onto each round (roughly 1/2 Tbs)...
 ...then folded it over and used a fork to pinch and seal the edges.  You might have a little pumpkin filling or liquid come out, and that's okay--just adjust how much you put in the next one so you don't waste too much squished out filling.  :)
 I used a paring knife to cut 2 small slits in the top of each pie, then brushed with melted butter and sprinkled with cinnamon-sugar before baking.  Then it's back into the oven for about 10 minutes at 350 degrees, until it's flaky and golden brown.
 Just out of the oven!
 And here they are, all finished, warm, and delicious. 

So now that my house is all decorated for Fall, smells like spices, and I have warm little pumpkin pie bites to fill my belly, I feel like Fall is truly here!  Happy October!


Pin It


Photobucket

LinkWithin