A couple weeks ago, my friend Krissy asked me to make a giant canvas for her boyfriend's Christmas present. She had seen another typography project that I made earlier this year and fell in love with it, but wanted something bigger for her boyfriend's new apartment.
I'm not going to lie, I didn't take too many pictures of this one because my camera wasn't working right and wouldn't focus for most of the pics I tried to take. But here's what I did get:
The first step of making a canvas this large is to create your typography on the computer. I used Picnik to create mine because I love all the different fonts it offers and it's easy to set it up how you like.
Once I had the layout how I liked, I used a projector hooked up to a computer (thank goodness for technology at the school I work at!) to project the image onto the canvas and traced it with a pencil. If you don't have a projector to use, you can try to freehand it. I was using a canvas that was 30" x 40" so freehanding it would have been hard---it would be easier to freehand using a smaller canvas, though.
I then used a medium blue acrylic paint to paint in the words over the pencil.
Again, I apologize for not having more pictures, but for whatever reason I could not get my camera to focus at all :(
Here's the finished product! You can see Krissy's hand in the picture-we had to take this outside at night, and my camera (for whatever reason) finally decided to work right! So frustrating, but I'm so glad I got a picture of the finished product!
Pin It
xoxo, Melissa
Showing posts with label subway art. Show all posts
Wednesday, December 21, 2011
Wednesday, September 7, 2011
Tutorial: Fall Subway Art & Frame
So today is my FIRST "Crafty Wednesday" and I'm pretty pumped! I found a super cheap, very beautiful Fall craft that is quick and adds a really pretty Fall touch to your home.
Please note: There are a million and one craft blogs out there (and I'm an avid reader of a lot of them!). If I do a tutorial that is inspired by a specific blog or is taken directly from a specific blog, I will *always* give credit where credit is due! My goal isn't to pretend that all of these amazing crafts and ideas are mine, but to share these great projects with my readers. If you feel like the craft I have featured was not credited appropriately, please feel free to message me so I can make sure that credit is given to the right person/people!! :) No toe-stepping here!
Okay, that being said, lets get on to the crafting!
In my blog reading, I've seen a lot of "subway art" which I am quickly falling in love with. It kind of reminds me of the word clouds I made with my students last year using their vocab words. (check out word clouds and make your own at Wordle) I was mostly inspired by Kristin over at Adventures of a Betty Crocker Wannabe and Crissy at Crissy's Crafts. I loved the word choices/design that Kristin used and the frame that Crissy made, so I decided to make my own!
First, I used Picnik to make my subway word art. It was probably the longest process in the whole project, figuring out which words I wanted to use and how I wanted them laid out on the paper. Once I made it and saved it to the computer, I printed it off as a 5"x7" which of course only took up part of my page (printed on 8.5"x11" scrapbook paper so I cut it down.
I took a framing mat that I had lying around that's made for 5"x7" (free since I already had it!)
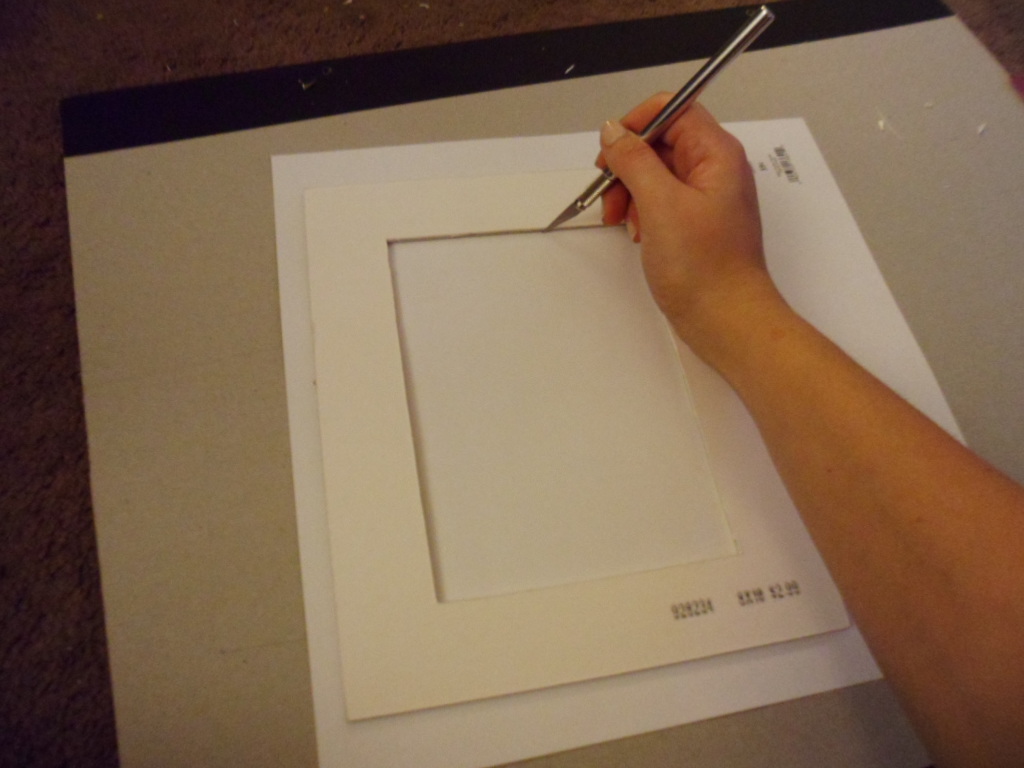
and I laid it on the backside of a 12"x12" piece of Fall-themed scrapbook paper, then used my Exacto to cut the edges around the frame. Note: You may want to use a ruler or straight-edge to make sure that your lines are smooth. I freehanded it and the edges aren't too bad, but I think next time I'll use something to keep them straight.
Now you have your white mat frame and the scrapbook overlay for it.
Using white craft glue and my fingers (gotta get messy, but I suppose you could use a brush...) I spread the glue all over the front side of the mat frame, making sure to go all the way to each edge and corner. Then I laid the scrapbook paper overlay on top and smoothed it all out. Once it dries, you'll have this (I put it against a while piece of paper so it stands out more):
Now flip it over and spread a thin line of white craft glue around the mat frame opening edge and press your subway word art printout on (so the word art can be seen through the mat frame opening when you look at the front side).
Here's my final piece!
And here it is on my livingroom console table---a nice size, full of beautiful colors, and a reminder of the wonderful parts of Fall!
Go ahead and try it out! This craft total took me maybe 20 minutes, and the only thing I had to buy was the scrapbook paper, which was 40% off. Total cost of this project: $1.18 + tax (and that's only because I don't have my scrapbook paper here--otherwise it's free!)
Make sure to head over to Crissy's Crafts to see the original and her take on it--super cute, and she's got a great downloadable for different phrases to frame if the subway art isn't your thing!

Please comment and let me know what you think!!! And if you try this out, let me know how it goes--I'd LOVE to see what yours looks like!
Please note: There are a million and one craft blogs out there (and I'm an avid reader of a lot of them!). If I do a tutorial that is inspired by a specific blog or is taken directly from a specific blog, I will *always* give credit where credit is due! My goal isn't to pretend that all of these amazing crafts and ideas are mine, but to share these great projects with my readers. If you feel like the craft I have featured was not credited appropriately, please feel free to message me so I can make sure that credit is given to the right person/people!! :) No toe-stepping here!
Okay, that being said, lets get on to the crafting!
In my blog reading, I've seen a lot of "subway art" which I am quickly falling in love with. It kind of reminds me of the word clouds I made with my students last year using their vocab words. (check out word clouds and make your own at Wordle) I was mostly inspired by Kristin over at Adventures of a Betty Crocker Wannabe and Crissy at Crissy's Crafts. I loved the word choices/design that Kristin used and the frame that Crissy made, so I decided to make my own!
First, I used Picnik to make my subway word art. It was probably the longest process in the whole project, figuring out which words I wanted to use and how I wanted them laid out on the paper. Once I made it and saved it to the computer, I printed it off as a 5"x7" which of course only took up part of my page (printed on 8.5"x11" scrapbook paper so I cut it down.
I took a framing mat that I had lying around that's made for 5"x7" (free since I already had it!)
and I laid it on the backside of a 12"x12" piece of Fall-themed scrapbook paper, then used my Exacto to cut the edges around the frame. Note: You may want to use a ruler or straight-edge to make sure that your lines are smooth. I freehanded it and the edges aren't too bad, but I think next time I'll use something to keep them straight.
Now you have your white mat frame and the scrapbook overlay for it.
Using white craft glue and my fingers (gotta get messy, but I suppose you could use a brush...) I spread the glue all over the front side of the mat frame, making sure to go all the way to each edge and corner. Then I laid the scrapbook paper overlay on top and smoothed it all out. Once it dries, you'll have this (I put it against a while piece of paper so it stands out more):
Now flip it over and spread a thin line of white craft glue around the mat frame opening edge and press your subway word art printout on (so the word art can be seen through the mat frame opening when you look at the front side).
Here's my final piece!
And here it is on my livingroom console table---a nice size, full of beautiful colors, and a reminder of the wonderful parts of Fall!
Go ahead and try it out! This craft total took me maybe 20 minutes, and the only thing I had to buy was the scrapbook paper, which was 40% off. Total cost of this project: $1.18 + tax (and that's only because I don't have my scrapbook paper here--otherwise it's free!)
Make sure to head over to Crissy's Crafts to see the original and her take on it--super cute, and she's got a great downloadable for different phrases to frame if the subway art isn't your thing!

Please comment and let me know what you think!!! And if you try this out, let me know how it goes--I'd LOVE to see what yours looks like!
Subscribe to:
Posts (Atom)