Ugh, it's the first day of Fall and it's too rainy to really go out and enjoy it! Our plans for today involved getting hot pumpkin/apple drinks, going apple-picking, and seeing the beautiful leaves and scenery up here as the colors change. Instead, we've spent the day inside in our comfy clothes trying to stay dry and warm (minus the short trip to the PX for wine and a few grocery items...you know, the necessities in life. And yes, we may have gone in our comfy clothes. But seriously, a world where it's not appropriate to wear yoga pants to the store on a rainy day is not a world I want to live in.) The upside is that there is a Dunkin' Donuts at the PX so I at least was able to have a hot apple cider...
On the bright side, since it's been a rainy day at home, I've had a chance to actually get stuff done. Our TV broke earlier this week, so we had to finally break down and buy a new one. H wasn't too upset about that, because it meant we could finally get a flat-panel TV that he's been dreaming of/drooling over for the past year. Thank goodness for clearance TVs and financing options, because otherwise we would have had to move the 19-inch console out of our bedroom and hope that you could see it from across the room on the couch! However, due to making room for a larger TV and stand, plus all the packaging materials, our livingroom was absolutely a mess, so today was the perfect opportunity to get the house cleaned up and do some laundry--oh the joys of being a housewife! :)
It's also given me a chance to start planning out some ideas for my new classroom. This past week, I was hired as the lead preschool classroom teacher at a local preschool & daycare, and I couldn't be more excited! I'll be taking over for the current lead teacher who is leaving next week. Yesterday was my first full-day in the classroom shadowing her, which I will also be doing next week until she leaves so I get the chance to get used to a typical day in the classroom. It's going to be an interesting transition from a Montessori to a public, non-Montessori setting, but I can see already that there are a lot of opportunities to introduce some Montessori ideals into the classroom that the kids would really benefit from. The classroom is already set up in centers and follows Creative Curriculum (which I haven't looked into too much yet), but I see a lot of ways to incorporate Montessori - there are already some Montessori-ish works and ideas in place, they just need focused and used properly. I've been talking about these ideas with the director and with my assistant teacher, and I'm excited about what's to come for my little ones! There's so much potential with a new classroom, and I just pray that I can get my assistant teacher on-board with some of these ideas (she has never seen a Montessori classroom and doesn't really know what it is, so I'm hoping that she'll be open to learning and trying it).
God's abundant blessings just keep coming our way, and I feel so blessed to have a Savior who cares so much for us and who takes care of us! Even when I'm worried about what's going to happen and when it's going to happen, I have the comfort of knowing that His timing is perfect and that He will provide!
-M
Showing posts with label fall. Show all posts
Showing posts with label fall. Show all posts
Saturday, September 22, 2012

Sunday, November 6, 2011
Tutorial: CrockPot Apple Butter
I swear, nothing smells better in our house than Fall cooking: pumpkin, cranberries, spices, and of course apples! And I LOVE to eat all the yummy Fall cooking (which is probably why my Winter clothes always seem to be a little snug...hmmm...). One of my favorites is apple butter. Every October, my fiance and I go to the local Apple Butter Fest, where they have huge vats of apples and spices cooking down into homemade apple butter. Usually we stand in the extremely long line to wait and buy a jar of the delicious stuff, but this year with a smaller budget and a longer line, we decided to try making our own instead!

For the record, apple butter is something that I have never made before, so I was a little worried about how this was all going to turn out. I pictured it not tasting right or not having the right texture or all of it burning on the bottom of the crock pot and not being able to be eaten. Insert scary apple butter nightmares here.
Reality: It was soooo easy! And it turned out really delicious. And the best part? It's homemade, so it automatically tastes better!
Okay, so here's the tutorial. Honestly, the hardest parts were peeling all the apples and then waiting for the stuff to cook down (You know, when you can smell all that appley-goodness but can't eat it yet?! You know what I'm talking about...). I definitely recommend making this yourself, not just because it's easy, but also because you know EXACTLY what's going into it and you can control the amount of sugar you use. You wouldn't believe the amount of sugar in store-bought apple butter!
First, get your ingredients:
 -I used 6 lbs of Jonagold apples for my 8-quart crock-pot, which filled it perfectly to the top--this cooked down to fill 2 large Ball jars. You can use any kind of apple (except Red Delicious or Yellow Delicious), and I recommend picking ones that have a sweet, crisp flavor--you'll use less sugar that way.
-1 tsp ground cinnamon
-1 tsp ground cloves
-1 tsp apple pie spice
-1 1/2 cups apple cider (you can use sugar-free if you prefer, but you'll probably end up wanting to add more sugar to taste at the end unless you like a less-sweet flavor in your apple butter)
-Sugar to taste, added 1/4 cup at a time at the very end of the cooking process

Peel, core, and chunk your apples and put them in the crockpot. I used one of those corer-slicer things to make it go quicker.
Add your spices, then add your cider. Stir it up so most of your apples are covered with the spices and cider.
Now comes the hard part...turn the crockpot to "low" and walk away. Your apples need to cook for at least 16 hours, but you might find that after 16 hours it's still not cooked down to a consistency you like. For ours, we cooked it for 20 hours (yes, that's almost one full day--trust me, the wait is worth it!) to get it the thick and smooth consistency we prefer. Okay, don't totally walk away. Make sure to come back and stir it once in a while. I chose to stir it every couple hours at first, because I was around the house, but after about 5 hours I left it alone and only stirred it a few more times during the rest of the cooking process. Stirring it at the beginning is important to make sure it's cooking evenly.

This is about 8 hours into the cooking process. The apples have started to cook down, and at this point your house will smell ah-may-zing!!

This is after 20 hours of cooking. You can see how much everything cooks down and how the color changes. Stir it up and taste it--now is the time to add sugar until it's got the sweetness you prefer. We added 2/3 cup of sugar total to ours to get it to the right flavor that we like, but this is totally up to you!
You can "can" this afterward if you choose, but it's not necessary. This will last in your fridge up to 3 months (if it will even be around that long--around here, it's lucky to last a month!) and this recipe will make enough for a large jar for you and a large jar for a friend--a perfect, homemade gift!
So enjoy your homemade apple butter and make sure to let me know how yours turns out!
Pin It
I'm linked up here:
Not So Simple Housewife
Passionately Artistic
The Artsy Girl Connection
Tatertots and Jello
The Sasse Life


For the record, apple butter is something that I have never made before, so I was a little worried about how this was all going to turn out. I pictured it not tasting right or not having the right texture or all of it burning on the bottom of the crock pot and not being able to be eaten. Insert scary apple butter nightmares here.
Reality: It was soooo easy! And it turned out really delicious. And the best part? It's homemade, so it automatically tastes better!
Okay, so here's the tutorial. Honestly, the hardest parts were peeling all the apples and then waiting for the stuff to cook down (You know, when you can smell all that appley-goodness but can't eat it yet?! You know what I'm talking about...). I definitely recommend making this yourself, not just because it's easy, but also because you know EXACTLY what's going into it and you can control the amount of sugar you use. You wouldn't believe the amount of sugar in store-bought apple butter!
First, get your ingredients:

-1 tsp ground cinnamon
-1 tsp ground cloves
-1 tsp apple pie spice
-1 1/2 cups apple cider (you can use sugar-free if you prefer, but you'll probably end up wanting to add more sugar to taste at the end unless you like a less-sweet flavor in your apple butter)
-Sugar to taste, added 1/4 cup at a time at the very end of the cooking process

Peel, core, and chunk your apples and put them in the crockpot. I used one of those corer-slicer things to make it go quicker.
Add your spices, then add your cider. Stir it up so most of your apples are covered with the spices and cider.
Now comes the hard part...turn the crockpot to "low" and walk away. Your apples need to cook for at least 16 hours, but you might find that after 16 hours it's still not cooked down to a consistency you like. For ours, we cooked it for 20 hours (yes, that's almost one full day--trust me, the wait is worth it!) to get it the thick and smooth consistency we prefer. Okay, don't totally walk away. Make sure to come back and stir it once in a while. I chose to stir it every couple hours at first, because I was around the house, but after about 5 hours I left it alone and only stirred it a few more times during the rest of the cooking process. Stirring it at the beginning is important to make sure it's cooking evenly.

This is about 8 hours into the cooking process. The apples have started to cook down, and at this point your house will smell ah-may-zing!!

This is after 20 hours of cooking. You can see how much everything cooks down and how the color changes. Stir it up and taste it--now is the time to add sugar until it's got the sweetness you prefer. We added 2/3 cup of sugar total to ours to get it to the right flavor that we like, but this is totally up to you!
You can "can" this afterward if you choose, but it's not necessary. This will last in your fridge up to 3 months (if it will even be around that long--around here, it's lucky to last a month!) and this recipe will make enough for a large jar for you and a large jar for a friend--a perfect, homemade gift!
So enjoy your homemade apple butter and make sure to let me know how yours turns out!
Pin It

I'm linked up here:
Not So Simple Housewife
Passionately Artistic
The Artsy Girl Connection
Tatertots and Jello
The Sasse Life

Thursday, October 6, 2011
Tutorial: Bread in a Can
A few weeks ago, while having coffee with my friend from college, Krissy, I told her about how I found this great idea for making bread in a can from this great craft blog. After going on about how it combined my two loves: baking and crafting, and how much I couldn't wait to try this project for my blog, she asked me if I could wait just a few more weeks to do it, but that if I did wait she would pay me for it.
Um. Duh. Of course I will--are you kidding me? I have a million other craft ideas to create and blog in the mean time!
She's a high school teacher who needed a nice gift for her secret pal at work, and thought that bread in a can would be perfect! She told me she'd pay me for the materials, plus for my work (I told her none of this was necessary, but she insisted) and that she's need them at the beginning of October. Perfect! I can make yummy Fall quick breads in cute cans, and it's a great excuse to go crazy with the decorating--I mean, who wants an undecorated, uncute gift? No one! Let the crafting begin!
So this week, I made bread in a can. Again, I can't take full credit for this--it's something that's been going around the crafting world for a while, and I got my banana bread recipe from Chasing Fireflies. What I didn't get from her wonderful blog was a recipe for a pumpkin quick bread (which I already had) and the ideas for how I was going to decorate these beautiful cans.

If you want the banana bread recipe, head over to Chasing Fireflies because she has done an amazing job with the recipe and her own design of the cans.
Here's my recipe for pumpkin quick bread. You can add walnuts to it, but since I didn't know if the receiver of this gift has any allergies, I decided to leave it out this time. But it's definitely yummy to add a 1/2 cup of walnuts to this before you bake it!
Pumpkin Quick Bread
1 1/2 c flour
1/2 tsp salt
1 c sugar
1 tsp baking soda
1 cup pumpkin puree (canned or fresh)
1/2 c veg oil
2 eggs, beaten
1/4 c water
1/2 tsp nutmeg
1/2 tsp allspice
1/2 tsp cinnamon
 First, mix your dry ingredients (including sugar for this recipe) in one bowl and your wet ingredients in another bowl. Super easy, right?
 Now is the hard part: mix them together. Okay, I'm kidding; this is not hard. In fact, this might be one of the easiest recipes ever.
 Instead of baking them in a loaf pan or muffin pan, I'm baking them in washed out veggie cans! One can for pumpkin, one can for Chasing Fireflie's banana bread, and a third can (not pictured) for the leftovers so that I can munch on them...hehehe...
 All I did was take off the lid (make sure to use a can opener that doesn't leave a jagged or sharp edge), take of the labels, and wash them out very well.
Before you pour your bread into the cans, though, you need to make the new pretty labels. Trust me, this is way easier before you bake them than after! I just chose 2 different scrapbook papers that have complementary colors, plus 2 small tags.
 Take the paper and wrap it around the can with the pretty side facing in. This way, you can draw on the paper without worrying that the receiver will see it.
 Draw around the edge of the bottom of the can so you know where to cut. I used the inside part of the bottom lip so that I'll have a silver can border around the edge of each paper. You can kind of feel where it indents, and then I just used a pencil to mark it.
 Cut your paper on the pencil line, and voila! You have a new, much prettier label for your bread cans. You don't want to bake the labels, though, so don't attach them yet.
 Next, I traced the tag onto the scraps of paper left over, cut it out, and glued them on so I had matching tags for each can.
 You can see here are my 2 labels and 2 tags. Since they are complimentary colors, you can mix and match the tags and labels if you want.
 Now, fill your unlabeled cans. I filled each of them 3/4 of the way full. Be careful!! If you fill them too full, they will bake over the top and that won't be a very pretty display--it can also fall off into your oven and make that awful burning smell....not that I know from experience or anything...
 Once they come out of the oven, let them cool completely before you try to put the labels on. I put them in the fridge overnight to ensure that they were cool enough. I also then let them warm up to room temp before I tried to put the labels on, so the cold can didn't cool the hot glue too fast for me to put the labels on.
I used hot glue to attach the labels to each can. Go slow, only gluing a small portion at a time, and make sure you line up your label before you glue or your label might be warped when you're finished. I didn't take pics of this because it's hard to hold a camera, a can, and a glue gun all at the same time. But here are the cans after they were labeled:
 Next, I cut plastic wrap just big enough to cover the tops of each can with just a little hanging over the edge. This will keep them fresh before you give them away. I used 2 layers of plastic wrap, just to make sure.
 I used 2 squares of matching fabric on each can, just laying them on top with alternating points, and then folded the edges over the can lip. I used twine to secure the plastic wrap and material down (to keep them fresh) and then used twine to tie a pretty bow on top with my labels.
Here they are all finished:

How cute are these to give and get?! A great gift for a friend, coworker, teacher, new neighbor--anyone would love to get these!! :)
Totaling up the cost of these is a little harder, because it depends what you have on-stock in your cupboard. This is definitely a project/gift that you can do for under $10 though!
So go ahead and give it a try--even if you don't give it away, and you just make some bread in a can for yourself to eat on a crisp Fall afternoon! Bon appetit!
Pin It
Um. Duh. Of course I will--are you kidding me? I have a million other craft ideas to create and blog in the mean time!
She's a high school teacher who needed a nice gift for her secret pal at work, and thought that bread in a can would be perfect! She told me she'd pay me for the materials, plus for my work (I told her none of this was necessary, but she insisted) and that she's need them at the beginning of October. Perfect! I can make yummy Fall quick breads in cute cans, and it's a great excuse to go crazy with the decorating--I mean, who wants an undecorated, uncute gift? No one! Let the crafting begin!
So this week, I made bread in a can. Again, I can't take full credit for this--it's something that's been going around the crafting world for a while, and I got my banana bread recipe from Chasing Fireflies. What I didn't get from her wonderful blog was a recipe for a pumpkin quick bread (which I already had) and the ideas for how I was going to decorate these beautiful cans.

If you want the banana bread recipe, head over to Chasing Fireflies because she has done an amazing job with the recipe and her own design of the cans.
Here's my recipe for pumpkin quick bread. You can add walnuts to it, but since I didn't know if the receiver of this gift has any allergies, I decided to leave it out this time. But it's definitely yummy to add a 1/2 cup of walnuts to this before you bake it!
Pumpkin Quick Bread
1 1/2 c flour
1/2 tsp salt
1 c sugar
1 tsp baking soda
1 cup pumpkin puree (canned or fresh)
1/2 c veg oil
2 eggs, beaten
1/4 c water
1/2 tsp nutmeg
1/2 tsp allspice
1/2 tsp cinnamon


Before you pour your bread into the cans, though, you need to make the new pretty labels. Trust me, this is way easier before you bake them than after! I just chose 2 different scrapbook papers that have complementary colors, plus 2 small tags.


I used hot glue to attach the labels to each can. Go slow, only gluing a small portion at a time, and make sure you line up your label before you glue or your label might be warped when you're finished. I didn't take pics of this because it's hard to hold a camera, a can, and a glue gun all at the same time. But here are the cans after they were labeled:


Here they are all finished:

How cute are these to give and get?! A great gift for a friend, coworker, teacher, new neighbor--anyone would love to get these!! :)
Totaling up the cost of these is a little harder, because it depends what you have on-stock in your cupboard. This is definitely a project/gift that you can do for under $10 though!
So go ahead and give it a try--even if you don't give it away, and you just make some bread in a can for yourself to eat on a crisp Fall afternoon! Bon appetit!
Pin It

Wednesday, September 7, 2011
Tutorial: Fall Subway Art & Frame
So today is my FIRST "Crafty Wednesday" and I'm pretty pumped! I found a super cheap, very beautiful Fall craft that is quick and adds a really pretty Fall touch to your home.
Please note: There are a million and one craft blogs out there (and I'm an avid reader of a lot of them!). If I do a tutorial that is inspired by a specific blog or is taken directly from a specific blog, I will *always* give credit where credit is due! My goal isn't to pretend that all of these amazing crafts and ideas are mine, but to share these great projects with my readers. If you feel like the craft I have featured was not credited appropriately, please feel free to message me so I can make sure that credit is given to the right person/people!! :) No toe-stepping here!
Okay, that being said, lets get on to the crafting!
In my blog reading, I've seen a lot of "subway art" which I am quickly falling in love with. It kind of reminds me of the word clouds I made with my students last year using their vocab words. (check out word clouds and make your own at Wordle) I was mostly inspired by Kristin over at Adventures of a Betty Crocker Wannabe and Crissy at Crissy's Crafts. I loved the word choices/design that Kristin used and the frame that Crissy made, so I decided to make my own!
First, I used Picnik to make my subway word art. It was probably the longest process in the whole project, figuring out which words I wanted to use and how I wanted them laid out on the paper. Once I made it and saved it to the computer, I printed it off as a 5"x7" which of course only took up part of my page (printed on 8.5"x11" scrapbook paper so I cut it down.
 I took a framing mat that I had lying around that's made for 5"x7" (free since I already had it!)
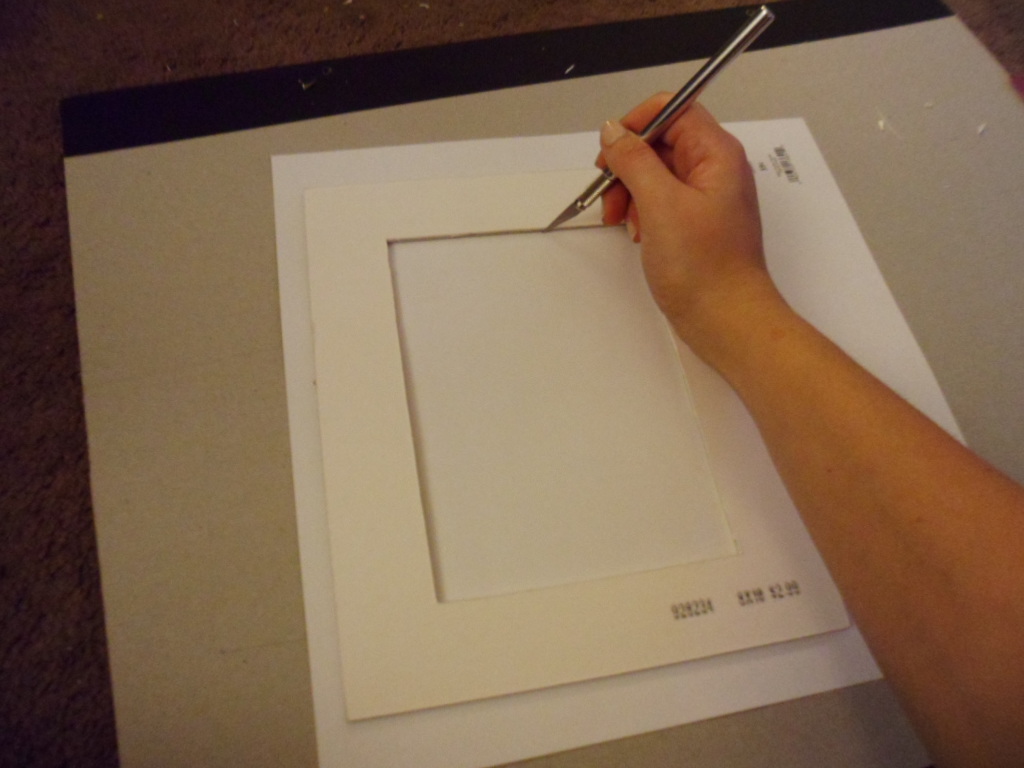
 and I laid it on the backside of a 12"x12" piece of Fall-themed scrapbook paper, then used my Exacto to cut the edges around the frame. Note: You may want to use a ruler or straight-edge to make sure that your lines are smooth. I freehanded it and the edges aren't too bad, but I think next time I'll use something to keep them straight.
 Now you have your white mat frame and the scrapbook overlay for it.
 Using white craft glue and my fingers (gotta get messy, but I suppose you could use a brush...) I spread the glue all over the front side of the mat frame, making sure to go all the way to each edge and corner. Then I laid the scrapbook paper overlay on top and smoothed it all out. Once it dries, you'll have this (I put it against a while piece of paper so it stands out more):
 Now flip it over and spread a thin line of white craft glue around the mat frame opening edge and press your subway word art printout on (so the word art can be seen through the mat frame opening when you look at the front side).
 Here's my final piece!
 And here it is on my livingroom console table---a nice size, full of beautiful colors, and a reminder of the wonderful parts of Fall!
 Go ahead and try it out! This craft total took me maybe 20 minutes, and the only thing I had to buy was the scrapbook paper, which was 40% off. Total cost of this project: $1.18 + tax (and that's only because I don't have my scrapbook paper here--otherwise it's free!)
Make sure to head over to Crissy's Crafts to see the original and her take on it--super cute, and she's got a great downloadable for different phrases to frame if the subway art isn't your thing!

Please comment and let me know what you think!!! And if you try this out, let me know how it goes--I'd LOVE to see what yours looks like!
Please note: There are a million and one craft blogs out there (and I'm an avid reader of a lot of them!). If I do a tutorial that is inspired by a specific blog or is taken directly from a specific blog, I will *always* give credit where credit is due! My goal isn't to pretend that all of these amazing crafts and ideas are mine, but to share these great projects with my readers. If you feel like the craft I have featured was not credited appropriately, please feel free to message me so I can make sure that credit is given to the right person/people!! :) No toe-stepping here!
Okay, that being said, lets get on to the crafting!
In my blog reading, I've seen a lot of "subway art" which I am quickly falling in love with. It kind of reminds me of the word clouds I made with my students last year using their vocab words. (check out word clouds and make your own at Wordle) I was mostly inspired by Kristin over at Adventures of a Betty Crocker Wannabe and Crissy at Crissy's Crafts. I loved the word choices/design that Kristin used and the frame that Crissy made, so I decided to make my own!
First, I used Picnik to make my subway word art. It was probably the longest process in the whole project, figuring out which words I wanted to use and how I wanted them laid out on the paper. Once I made it and saved it to the computer, I printed it off as a 5"x7" which of course only took up part of my page (printed on 8.5"x11" scrapbook paper so I cut it down.




Make sure to head over to Crissy's Crafts to see the original and her take on it--super cute, and she's got a great downloadable for different phrases to frame if the subway art isn't your thing!
Please comment and let me know what you think!!! And if you try this out, let me know how it goes--I'd LOVE to see what yours looks like!
Tuesday, September 6, 2011
Fabulously Fall
I don't know if you're aware, but I'm kind of obsessed with Fall.
Okay, maybe more than "kind of."
For as long as I can remember, I've loved Fall. There are a ton of reasons, but here are my biggest ones:
1. It's football season. Go Steelers!
2. The weather is perfect--not too hot, but not too cold either. Perfect for evening walks, picking pumpkins and apples, and wearing sweaters.
3. Fall clothing! I love sweaters, hoodies, and scarves!
4. Fall flavors/smells: pumpkin, apple cider, pear, leaves (clearly that's a smell, not a flavor...) Yum!
5. All the wonderful Fall activities like pumpkin and apple picking, the local applebutter festival, playing in the leaves, and curling up with a hot drink in the cool air.
Today was a beautiful Fall day! The sky was full of dark Fall clouds but it was sunny, the air was crisp and cool, I got to finally wear one of my cute sweaters, and I got my first Pumpkin Spice Latte of the year!! Yummm!
And because I've been feeling so darn crafty lately, I found some super cute Fall crafts I'm going to tackle. I've been reading a ton of craft/DIY blogs (um, check out my updated "favorites" list over there ---> ) and I think I'm going to start a "Crafty Thursday" blog entry. Every Thursday I'll be doing a new craft, documenting it, and giving you a tutorial on how to do it yourself! I can't guarantee they will be super awesome or any good, but darn it I'm going to try! :)
So stay tuned--this Fall is going to bring a lot of new and fun things (including my wedding!!! eek 66 days!!)
Okay, maybe more than "kind of."
For as long as I can remember, I've loved Fall. There are a ton of reasons, but here are my biggest ones:
1. It's football season. Go Steelers!
2. The weather is perfect--not too hot, but not too cold either. Perfect for evening walks, picking pumpkins and apples, and wearing sweaters.
3. Fall clothing! I love sweaters, hoodies, and scarves!
4. Fall flavors/smells: pumpkin, apple cider, pear, leaves (clearly that's a smell, not a flavor...) Yum!
5. All the wonderful Fall activities like pumpkin and apple picking, the local applebutter festival, playing in the leaves, and curling up with a hot drink in the cool air.
Today was a beautiful Fall day! The sky was full of dark Fall clouds but it was sunny, the air was crisp and cool, I got to finally wear one of my cute sweaters, and I got my first Pumpkin Spice Latte of the year!! Yummm!

And because I've been feeling so darn crafty lately, I found some super cute Fall crafts I'm going to tackle. I've been reading a ton of craft/DIY blogs (um, check out my updated "favorites" list over there ---> ) and I think I'm going to start a "Crafty Thursday" blog entry. Every Thursday I'll be doing a new craft, documenting it, and giving you a tutorial on how to do it yourself! I can't guarantee they will be super awesome or any good, but darn it I'm going to try! :)
So stay tuned--this Fall is going to bring a lot of new and fun things (including my wedding!!! eek 66 days!!)
Sunday, September 26, 2010
Sweatpant Saturdays/Sundays
I love love LOVE lazy weekends at home! I mean, anymore with how crazy work is, I tend to live for the weekends anyway. I need the weekends to recoup and actually remember that life can be totally enjoyable. So this weekend, H and I decided to spend Saturday laying around the apartment spending time together, watching our favorite show on DVD (to catch up on past episodes), and cooking an amazing dinner together. It was so relaxing and such a great bonding time for us--something that we've needed! Today, we slept in, made breakfast together, watched a little How I Met Your Mother (our fave show right now!), and we're spending the rest of the day going apple picking and then studying/doing lesson plans. It's really nice to just spend some quality time together and relax while doing things that we enjoy.
It's like the blessings just keep coming!

It's like the blessings just keep coming!

Subscribe to:
Posts (Atom)